Make-up Tips
The Eyes

Highlighting the eyes
A woman's eyes are perhaps one of her most alluring and feminine features. However, they are the technically most difficult part of makeup to master, but with practice, it gets easier and is worth the effort to try and perfect.
After applying foundation and powder, contouring the face, and adding blusher, the next step is to start work on the eyes.
We will start at the top with the eyebrows and then work our way down, using eye shadow, mascara and optionally, eye-liner.
Eyebrows
As William Shakespeare so aptly puts it in As You Like It, the female eyebrow is a thing of beauty.
In describing the Third Age of Man, Shakespeare speaks of the young man in love, thusly:
And then the lover,
Sighing like furnace, with a woeful ballad,
Made to his mistress' eyebrow.
The first step is getting the shape of the eyebrows. You may not be in a position in your male life where plucking one's eyebrows is possible. However, you may get away trimming the longer hairs and some cautious shaping. Also, using a thicker concealer or even special eyebrow wax (from theatrical makeup suppliers) may be the answer.
For those without such constraints, getting you eyebrows professionally waxed and tinted is a great idea. All nail salons that I have visited offer this service.
Use an eyebrow pencil, but use it lightly, feathering gently over the eyebrow hairs. Do not draw a hard line, as this is not the fashion these days to have the eyebrows too harshly defined. After using the pencil, gently smudge the eyebrows with your finger to smooth them so that any pencil lines are not visible. Aim for bold, but not harsh brows.
Christine's Tip
An alternate technique that I now prefer is to use a dark eyeshadow and a small brush to create my eyebrows. Apply it lightly and blend it carefully.
The ideal shape of a woman's eyebrow
There is some basic geometry that needs to be explained to understand the beauty of the female eyebrow. Below is an anatomical diagram to work out its ideal shape.
A ___ A is a vertical line goes from the inside edge of the eyebrow to outer edge of the nose.
B ___ B is a tangential line that line starts at the edge of the nose, touches the edge of the eye and ends at the end of the eyebrow.
C ___ C is a horizontal line that goes from the beginning to the end of the eyebrow.
D ___ D is a vertical line (which passes the outer edge of the iris), indicating the highest point of the arch of a woman's eyebrow.
Eyeshadow
|
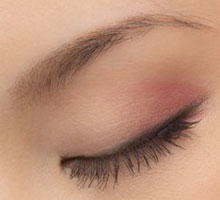
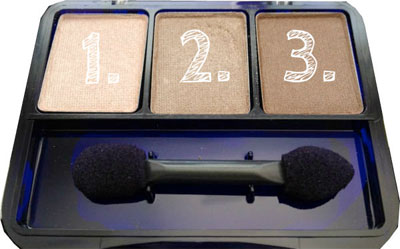
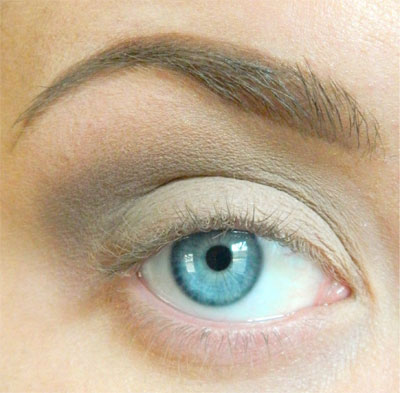
This is where you really get a chance to be creative. You have two basic options. The first is to use natural skin colours to create the illusion that you are not wearing eyeshadow. This would work best for daytime makeup. The images that that is displayed are here are a good example daytime eye shadow, with three colours, cream to brown. The second option is a more dramatic style for evenings. Here one might use other colours. I sometimes use a combination of plum, grey and dark pink, with white highlights.
Generally speaking three colours will do the job. The following images explain some of the steps, using three colours, all more or less natural shades:
|
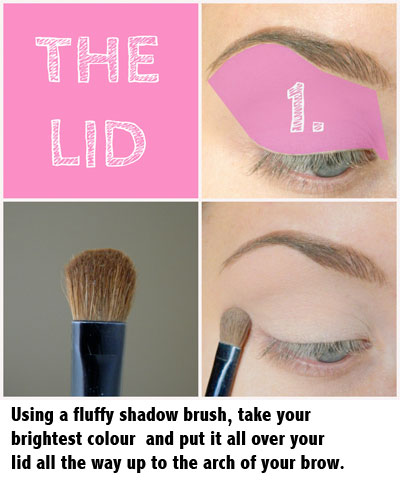
The lightest colour eyeshadow (1.)Here is an image of the eyes with the lightest colour eye-shadow, covering all the upper lid and extending just onto the brow bone. |
 |
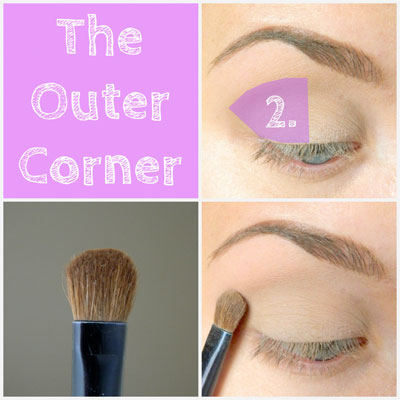
The outer corner of the eye (2.)Next use the middle colour on the outer third of the eye lid. |
|
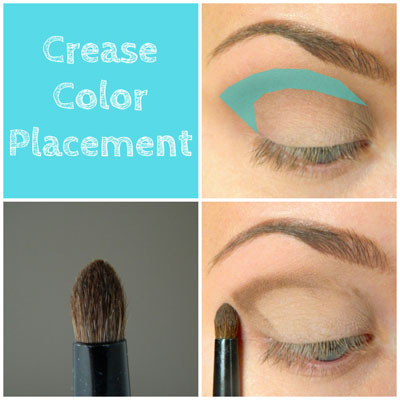
The crease of the eye (3.)Next, we apply the darkest of the three eyeshadows in the crease of the eye and gently brush as shown in the picture on the right. Include the outer half of the eyelid itself and extend it slightly past the outer edge of the eye sweeping upwards slightly. |
 |
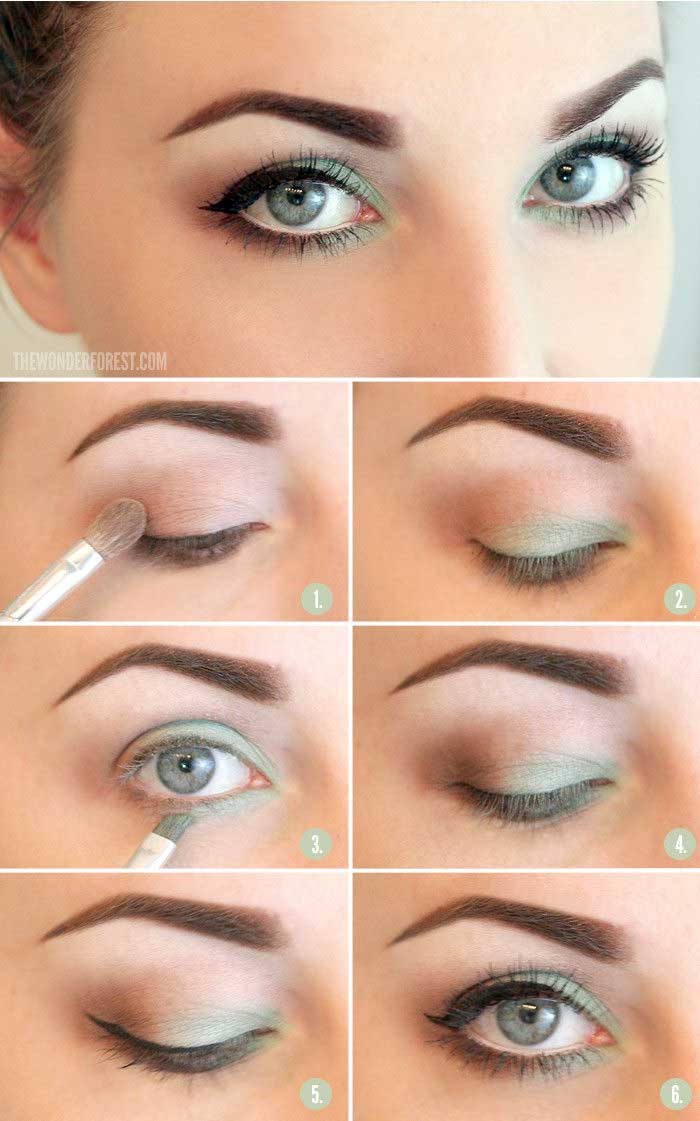
The final and most important stepI cannot stress enough that most crucial finishing step is to blend the colours so that there is no abrupt transition from one colour to the next. Blend by gently brushing back and forward, up and down where different colours meet, to soften the look. To see a good example of the steps to eye shadow: Click Here |
|
Eye Shadow Mistakes
|
Eyeshadow seems like the most straightforward makeup product - just swipe on the lids and you're done. However, with different pigments and bold colors, we all make mistakes every now and again. We've compiled the most common pitfalls, and of course, how to avoid them. 1. Matching Your Eyeshadow to Your Eye Color 2. Forgetting to Blend 3.Using Applicators that Come with the Shadow |
4. Applying Too Much Below the Eye 5. Applying Eyeshadow After Concealer 6. Using Shimmery Shadows on Aging Lids 7. Skipping Liner and Mascara |
MascaraI have found that there is a real difference between a good quality mascara and a cheap one. The quality products give a much richer, less clumpy look. Start with the upper lashes and place the applicator on the the top pf the lashes and blink. This applies mascara to the upper surface of the lashes. Next use the brush from beneath the lashes is an upward arching movement. Start with the inner lashes and work your way outwards. The lower lashes require more care as they are smaller and many women do not use mascara on them at all. A curved mascara applicator can make this job easier. Gently brush back the lashes with small strokes. Do not have the brush too heavily loaded with mascara when doing the lower lashes. Another useful technique to get a better curl to your upper lashes is to use eyelash curler, before and after applying mascara. |
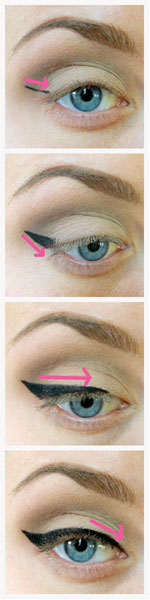
EyelinerEyeliners are usually pencil, liquid or gel. Liquid eyeliner, which can give a more dramatic effect, is tricky to use and mistakes can easily be made, which can mean restarting your eye makeup from scratch! Gel eyeliners are very popular and user-friendly. Using a dark brown or black eye shadow, applied with a small, angled brush is a good, easy-to-do alternative. Start with the upper lid, beginning a the mid point of the eyelid and work towards the outside. Use multiple small strokes, rather than trying to draw a line. As you approach the outer edge of the eyelid, make the line a little thicker and extend it slightly past the corner of the eye, aiming in the direction of the end of the eyebrow. For the lower lid, gently draw a line where the hairs come out, again starting in the middle, moving to the outer edge, where it should met up with the upper lid eyeliner. |
|